


01
Complete DIY Kit
Foam cans, application gun, cleaner and safety essentials included.
Professional spray-foam insulation, sized for real DIY projects and packed with the tools and safety essentials you need to finish with confidence.
Foam cans, application gun, cleaner and safety essentials included.
Helps reduce heat loss and energy bills while minimizing noise for a quieter, more comfortable space.
Combines up to 80% closed-cell content with smooth expansion, a moisture-resistant outer layer and a flexible inner core.
Attics, walls, garages, crawl spaces, sheds and metal buildings.
Shake, connect the gun and apply with controlled, even passes.
Allow each layer to cure before adding more thickness.
Surface condition and spraying technique can change real-world coverage.
Built for real DIY projectsChoose a complete kit and get started with confidence.
Buy nowEnter your project area, pick your can size and finished thickness, then add a real-world buffer. Your best matching kit combination appears below.
Note: For effective insulation performance, we recommend applying the foam at a 2-inch thickness. Coverage may vary depending on surface condition, application thickness, and spraying technique.
Recommended kits are highlighted and shown first.
View all kit options


 Featured bulk optionDealer quantitiesFor larger projects, contractors and dealer quantities.Explore bulk kits
Your estimate is readyReview the recommended kits and choose your best fit.
Buy now
Hecho para proyectos reales
Y'all Can DIY está diseñado para que aislar por tu cuenta sea más sencillo. La espuma, las herramientas de aplicación, el limpiador y el equipo de seguridad funcionan juntos como un sistema completo. Así puedes avanzar paso a paso y terminar tu proyecto con confianza.
Un kit. Pasos claros. Sí puedes hacerlo.
Calcular mi kitEvery pack includes genuine Y'all Can DIY application equipment and essential safety gear, presented as one coordinated professional system.

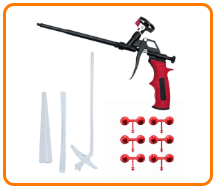


Everything you need is includedPick the pack size that fits your project.
Buy nowPRO TIP: For best results, make sure the can and surface are between 60°F-90°F (15°C-32°C).
Wear the protective suit, gloves, goggles and mask before starting.
Remove dust, oil and loose material. Lightly mist suitable surfaces before application.
Prepared for a better result?Choose your kit before you start.
Buy nowRemove dust, dirt, oil and loose material.
Lightly mist the surface before application.
Shake the can thoroughly before and during use.
Secure the can properly to the application gun.
Apply with controlled, even movement.
Let the first layer cure before continuing.
Ready to spray it right?Shop a complete DIY kit for your project.
Buy nowSee how traditional fiberglass batts compare with a controlled DIY spray foam application for gaps, cavities and hard-to-reach project areas.


Ready for controlled coverage?Find the kit that fits your project.
Buy nowHave a space in mind?Match it with the right kit size.
Buy now
I was unsure at first, but this foam worked really well.
It was easy to use, cleaned up easily, and I’m glad I gave it a try.
M.W. | Judge.me customer review
This kit made it surprisingly easy.
I wanted better sound insulation in my garage. I’m really glad I tried it. Quick, simple, and worked great.
Sarah | Judge.me customer review
I liked the results a lot.
It didn’t cover as much as I expected, but I’d buy extra next time.
SteveY | Judge.me customer reviewReady for your own result?Compare every available kit size.
Buy nowBefore you start
So you can decide if this project is right for you.
Yes — this kit is built specifically to make real DIY insulation projects more approachable.
You don't need to be a professional contractor to tackle an appropriate DIY project. Your kit includes the application gun, cleaner and safety essentials you need to get started.
The key is preparation: protect yourself and the surrounding area, prepare the surface, shake the can thoroughly, and apply the foam in controlled passes and layers.
Take your time, follow the instructions, and start with a small section until you get comfortable with the application.
See the 6-step application guide ↑That's exactly why we built the Project Calculator.
Depending on can size, each can covers up to approximately 20–23 sq. ft. at 1-inch thickness, but actual coverage varies with application thickness, surface conditions and spraying technique.
Enter your project size and desired thickness into our calculator and we'll recommend a kit size. We also recommend adding a 10–20% buffer so you're less likely to run short halfway through your project.
Calculate my kit ↑For some projects, hiring a professional is absolutely the right choice. But not every insulation job needs to become a contractor project.
If your project is suitable for DIY and you're comfortable following the preparation, safety and application instructions, doing it yourself can let you avoid paying someone else for work you're capable of handling.
That's what Y'all CAN DIY is about: The right project. The right tools. And the confidence to do it yourself.
The essential application setup comes together in one kit.
Depending on the pack, you'll receive your spray foam cans together with the application gun, nozzles/spreaders, gun cleaner and safety essentials including gloves, goggles and a protective mask.
So instead of figuring out a separate shopping list before you can start, you can focus on your project.
One project. One kit. Less guesswork.
Many appropriately sized DIY projects can make great weekend projects — but your actual project time depends on the area, preparation, thickness and your experience.
The idea isn't to rush. Plan the project, calculate how much foam you need, prepare the surfaces before you start and build the foam in layers.
A little preparation before Saturday can make the weekend a lot easier.
Proper insulation and air sealing can help reduce unwanted heat transfer and air leakage, which can help your home use heating and cooling more efficiently.
How much that affects your individual energy bill depends on your home, climate, existing insulation, HVAC system and where the foam is installed.
So we don't promise a specific dollar saving. What you can do is identify appropriate areas where insulation or air sealing could improve your home's performance — and fix the projects that make sense for DIY.
Because insulation and air sealing aren't always the same thing.
Fiberglass can provide thermal insulation, but gaps and irregular areas around penetrations or other openings may still allow unwanted air movement.
Spray foam can be useful in appropriate gaps, cavities and hard-to-reach areas because it expands to fill the space.
Already insulated? Good. Now check the gaps.
Y'all CAN DIY spray foam is designed for appropriate insulation projects including:
Always check that the specific surface and application area are suitable before spraying. The product should not be used on high-heat surfaces or electrical areas.
That's okay. The gun is there to give you more control, not make the project more complicated.
Attach the can securely, keep the recommended spraying distance and use controlled, even movements.
If it's your first time, begin with a small test area so you can get a feel for the flow and expansion before moving onto the main project.
See how it works ↑Preparation makes a big difference.
Before spraying, protect nearby surfaces, put on the recommended safety equipment and make sure the application area is clean and ready.
Work in controlled passes rather than trying to fill everything at once. And keep the included gun cleaner ready for the application equipment.
Don't rush it. Controlled beats fast.
Not simply. Proper application matters more than just spraying as much foam as possible.
For effective insulation performance, we recommend a 2-inch finished thickness. Build the application in layers, allowing each layer to cure before adding more.
Use the Project Calculator to estimate the amount required for your desired finished thickness.
Then don't use it.
Spray foam is a great solution for many insulation and air-sealing projects, but it isn't the right product for every surface, location or situation.
Do not use it in prohibited areas such as high-heat surfaces or electrical areas, and always follow the product's application and safety instructions.
If you're unsure whether your project is appropriate for DIY, check the application guidance before starting or get professional advice.
DIY doesn't mean guessing.
Still thinking, “Can I really do this?”
The foam. The gun. The cleaner. The safety essentials. The instructions.
You bring the weekend. Y'all CAN DIY.